
Storyboarding is a tool for the filmmaker to use to plan composition, screen direction, visual rhythm, and progression of the story prior to shooting. But static frames are not able to express movement, camera action, or changing environmental conditions. To fill this void, image-based video previews have been used to add motion to chosen storyboard images. With Dreamina AI, you can explore these ideas using generated video clips. These previews can be useful for directors, writers, and independent filmmakers to talk about intentions for visuals prior to the use of production resources. They are still exploratory and not an actual prediction of what footage will look like when it is done.
What Moving Storyboard Previews Can—and Cannot—Tell You
Image-to-video workflows convert the still images of a storyboard into moving visual references conveying the desired camera movement, environmental motion, and the mood of the scene. You can use Dreamina AI to experiment with different camera movements, character movements, or background changes and see how they impact the story. These previews show fuzzy blocking, unclear direction of the screen, and wrong emphasis on the visuals prior to shooting. But the objects, gestures, or movements generated may not be present in the original image. They are also not like well-timed animatics, which take more time and effort for the shot durations, editing, and synchronization. Think of each clip you produce as a creative hypothesis, rather than a production plan. Appropriate real-world preparation is still needed for location scouting, lens testing, stunt coordination, and safety reviews.
Build a Storyboard Sequence Around Cinematic Intent
Think about the purpose of each scene in the storyboard rather than making arbitrary motion. An establishing shot may be used to show the surroundings and then slowly move towards the main place. A character entrance is a test to see how a person enters the composition and catches your eye. A limited push-in can be used when the dialogue is emotional without taking the focus away from the dialogue. The action beat is used to measure movement direction, character spacing, and scene readability. A reaction shot shows a reaction to a surprise, concern, or other response. Finally, a transition frame determines if a lighting, motion, or composition might link adjacent scenes. Your team can use Dreamina AI to bring these static images to life, while keeping the original storyboard as their guide.
Prepare Reference Frames for a More Coherent Preview
Before creating clips, arrange storyboard images by scene, shot number, and sequence. Write down the intent, camera position, character placement, and critical move for every shot. Describe characters, costumes, props, and places consistently between frames in related frames. Provide sufficient environmental detail to convey spatial relationships, but not so much detail that the composition is crowded. Make a distinction between fixed and flexible requirements; for example, a character’s costume is fixed, but background motion is flexible. If you have multiple references, use a visual guide and, if available, use Dreamina AI’s Omni reference feature. Reference-based workflows can be used to convey how a character looks and how they relate to one another in space, but can’t ensure that they will look the same when created independently of each other.
How to storyboard your film with Dreamina’s image-to-video previews
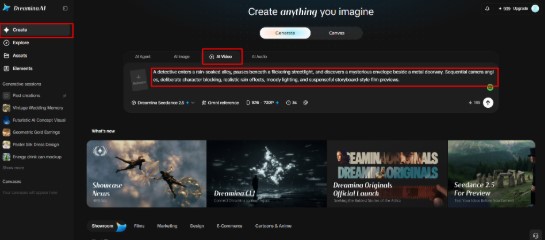
Step 1: Upload your storyboard frame and write a motion prompt
- Sign up or log in to Dreamina first, then get your first storyboard frame ready.
- Go to the “Create” tab from the left menu and select the “AI video” option.
- Enter a detailed text prompt about how you want the scene to look and feel. Add details on video elements, theme, and concept, like camera moves or shifting lighting mood.
Step 2: Choose a model and render the preview
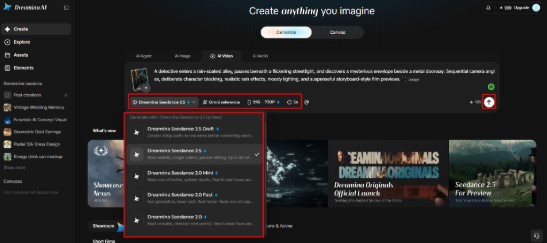
- Next, choose a model from the options present at the bottom of the dialogue box.
- The model list features Dreamina Seedance 2.5, Dreamina Seedance 2.0, and Dreamina Seedance 2.0 Fast.
- It also offers Dreamina Seedance 2.0 Mini and Dreamina Seedance 1.0, plus a few more.
- Click on “Omni reference” to guide the AI with multiple reference images of your characters.
- Pick a cinematic custom aspect ratio and resolution from the “Aspect ratio” and “Resolution” tabs.
- Finally, click on the “Generate” tab to begin creating your short moving storyboard preview clip.
Step 3: Refine the preview and export
- If the shot feels wrong, you can “Edit prompt” or “Regenerate” to refine the results.
- You can also edit the generated video using the “Edit video” option for bigger changes.
- Moreover, you can use “Edit segment” to edit only one part of the scene clip.
- Use “Extend video” to lengthen your clip, so the shot plays longer in your animatic. Apply “Creative upscale” to improve your video quality before you show it to your team.
- Dreamina gives you complete freedom to edit your preview the way you like it best.
- Finally, click on the “Download” tab present at the top right corner of the interface. This saves the video file on your local device, ready for sharing with your crew.
Use Prompts to Communicate Camera Language and Blocking
Camera moves are clearly differentiated from the action that is taking place within the scene. Pan is a horizontal rotation of the camera, and tilt is a vertical rotation of the camera. Dolly-in is when the camera is brought closer to its subject, while lateral tracking is when it is moved across the frame. Locked-off framing is a method of keeping the camera in a fixed position as other elements of the scene or subjects move. Indicate one major camera move and one major movement of the subject of each short preview. Include details such as: “Slow lateral tracking shot, character moves across the room from left to right, background set up doesn’t change. This technique is creating direction, camera movement, and consistency of space without adding extraneous movements. More complex simultaneous movements can yield less predictable results. Write down any errors so that the collaborators will know which aspects to fix.
Turn Individual Clips into a Usable Preproduction Reference
Created previews in the order of the scenes and lined them up with their storyboard panels. Add shot numbers, approximate times, dialogue cues, and planned transitions using an editing or presentation software program. Temporary captions can differentiate between sure creative choices and speculative points presented during creation. Discuss alternative camera setups, but do not adopt one as a “definitive” camera setup. Present the sequence to other collaborators and ask for comments on pacing, clarity, and intent for visuals. When movement is created that is different from the concept, retain the written shot list as the record of what was shot.
Identify Continuity Problems Before Production
Check screen direction, eye lines, character placement, costume and/or significant prop placement between adjacent previews. See if lighting and spatial relationships are consistent across shots. Flag movements that alter the beat or action in the story. Visual is impressive but not to the detriment of practical production constraints or safety requirements. Make sure there are no crucial decisions made without consulting the director, cinematographer, production designer, or other necessary crew members prior to shooting. While Dreamina AI previews can aid in these discussions, human judgment is crucial for assessing technical feasibility and narrative coherence.
Conclusion
Dreamina AI enables filmmakers to experiment with movement, atmosphere, and composition before shooting. Create uniform storyboard frames, explain shot intentions, create moving previews, and compare them to the original plan. Compile the best references in a reviewable order to provide feedback together. It’s not guaranteed footage; the main advantage of this is clearer creative communication. Utilize generated clips to explore ideas, clarify what you don’t know, and make more informed production decisions, with the storyboard and shot list as the primary tool for decision-making.